Posted inAnimal Crafts Craft from Recycled Materials Octopus Toilet Paper Roll Toilet Paper Roll Octopus Craft Posted by By Merryn November 17, 2016We first did this toilet paper roll octopus back in 2010 with the elder brother.…
Posted inToilet Paper Roll YouTube tutorial Stamping Activity: Spider, Lollipop and a Goldfish Posted by By Merryn October 25, 2016My youngest boy is now 3 years old. It is important to work on his soft…
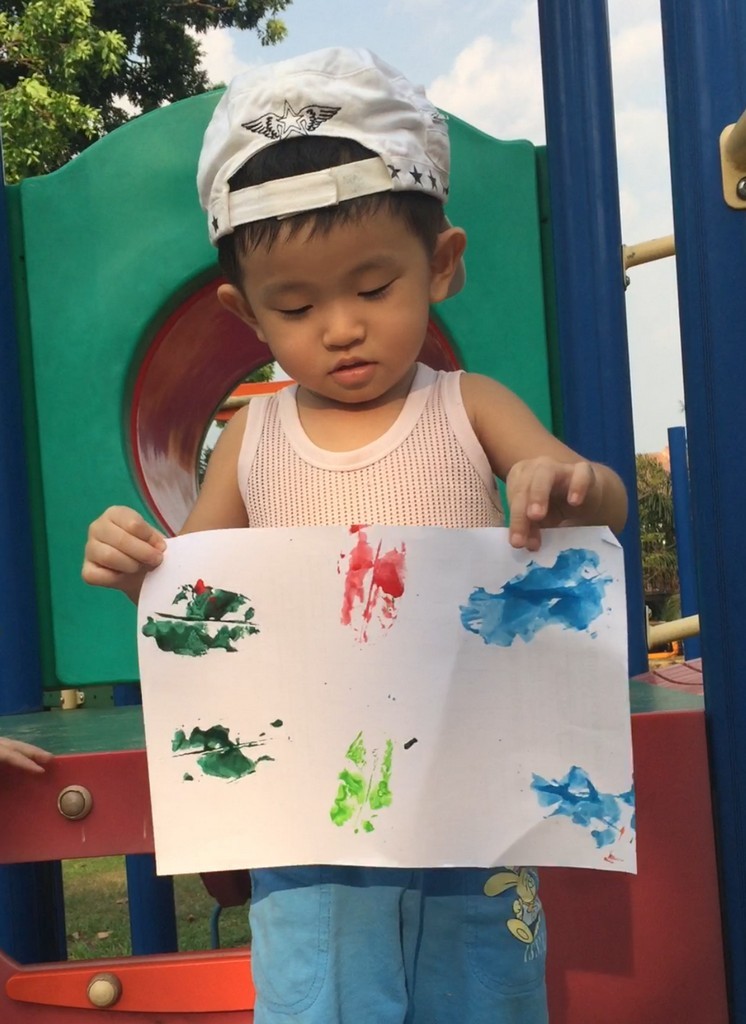
Posted inEgg Carton Vitagen bottle Leaf Stamping Art for Toddlers Posted by By Merryn April 22, 2016The hot spell brought many leaves to the ground and what better way to appreciate…
Posted inToilet Paper Roll Vehicle Multi-Level Toy Car Garage Posted by By Merryn August 10, 2015My boys have too many cars. They are everywhere. We built a multi-level toy car…
Posted inCrepe Paper Toilet Paper Roll Toilet Paper Roll Apple Tree Posted by By Merryn July 28, 2015After a long hiatus, we are finally ready to craft again as my little boy…
Posted inChinese New Year Festive Crafts Toilet Paper Roll Red Packet Lantern Posted by By Merryn December 29, 2014Chinese New Year is just one and a half month away so let's start making…
Posted inAnimal Crafts Bird Butterfly Craft from Recycled Materials Insect crafts Paper Crafts Party Craft Balancing Butterfly Craft Posted by By Merryn June 6, 2014This is a really fun craft that doesnt require any fancy materials. You’ll most likely…
Posted inCraft from Recycled Materials Handphone charger holder Posted by By Merryn August 1, 2013We'll be making an extremely simple handphone charger holder out of milk carton today. Handphone…
Posted inCraft from Recycled Materials Vehicle Sailboat Craft Posted by By Merryn July 24, 2013Let's go sailing! We'll be making a sailboat out of milk carton today. Milk carton…
Posted inBottles Do-It-Yourself Self-Watering Pot Posted by By Merryn June 21, 2013Hi there. It's been a while since our last update. We've been pretty busy lately.…
Posted inBottles Paper Mache Papier Mache Teacher's Day Vehicle Bottle Pencil Case Posted by By Merryn May 30, 2013This is a great school holiday crafts for kids. Today we will be transforming a…
Posted inAnimal Crafts Bird Craft from Recycled Materials Dried Leaf Chick Posted by By Merryn April 21, 2013We were walking in the park when we noticed lots of dried leaves scattered around.…
Posted inAnimal Crafts Craft from Recycled Materials Egg Carton Snake Egg carton snake Posted by By Merryn February 6, 2013Chinese New Year is approaching fast and we are ready to welcome the year of…
Posted inAnimal Crafts Craft from Recycled Materials Paper Crafts Paper Mache Snake Papier Mache Hook Posted by By Merryn September 25, 2012It's been some time since our last papier mache project so let's make one today.…
Posted inCD Craft from Recycled Materials Fridge Magnets Insect crafts Ladybug CD Ladybug Note Holder Posted by By Merryn August 29, 2012We have lots and lots of old CDs in our TV cabinet. Some of them…
Posted inAnimal Crafts Bird Egg Carton Hand and Footprint Art Egg Carton Handprint Owl Posted by By Merryn August 13, 2012Howdy craftiers! Sorry for the long absence. It's been some time now since our last…
Posted inCraft from Recycled Materials Toilet Paper Roll Toilet paper roll pencil holder Posted by By Merryn June 25, 2012Inspired by FamilyFun's dyed egg scuba diver craft, we improvised and came out with this:…
Posted inAnimal Crafts Bee Craft from Recycled Materials Crafts by Materials Crepe Paper Mother's Day Toilet Paper Roll Crepe Paper Pencil Holder Posted by By Merryn April 29, 2012I've always loved the fine art of pottery. I wish to try pottery with the…
Posted inCraft from Recycled Materials Easter Festive Crafts Toilet Paper Roll Easter Egg Mickey Mouse Posted by By Merryn April 3, 2012Easter is just around the corner. Thanks to www.family.go.com, we found this cute way to…
Posted inBeads Craft from Recycled Materials Crafty Crafted Friends Insect crafts Button Bugs Posted by By Merryn February 22, 2012Yvonne of MyDiaryMyBlog shared with us this cute craft made by her kids from recycling old…
Posted inCorrugated Paper Craft from Recycled Materials Paper Crafts Textured Space Art Posted by By Merryn February 20, 2012My boy loves the outer space. He found this picture online the other day. He…
Posted inCraft from Recycled Materials Print Art Toilet Paper Roll Valentine's Day Valentine’s Torch Posted by By Merryn February 13, 2012It's Valentine's Day in a few minutes time. We did a Valentine craft today. It…
Posted inBottles Christmas Ideas DIY : Soft Glow Light Posted by By Merryn December 18, 2011We were privileged to be invited to dine at The Speakeasy Restaurant and Bar yesterday.…
Posted inAnimal Crafts Bird Craft from Recycled Materials Easter Toilet Paper Roll Toilet Paper Roll Bird Posted by By Merryn November 1, 2011Let's make a bird today. Not an angry bird but a cute one :D Toilet…
Posted inAnimal Crafts Bat Craft from Recycled Materials Festive Crafts Halloween Party Craft Toilet Paper Roll Toilet Paper Roll Halloween Bat Posted by By Merryn October 18, 2011Halloween is around the corner and it's time to make some creepy crafts :D Toilet…
Posted inCorrugated Paper Craft from Recycled Materials Crafts by Materials Vehicle Traffic in the city Posted by By Merryn September 10, 2011We saw some boxes lying at the corner of the craft room and came out…
Posted inCraft from Recycled Materials Craft Stick Crafts by Materials Toilet Paper Roll Rainbow craft stick stationery holder Posted by By Merryn September 4, 2011I did a craft stick stationery holder with my student earlier this year. Refer to…
Posted inCraft from Recycled Materials Crafty Crafted Friends Egg Carton Egg Carton Flowers Posted by By Merryn September 2, 2011Victoria of Reuse Crafts shared with us this beautiful egg carton flowers craft. Egg Carton…
Posted inCorrugated Paper Craft from Recycled Materials Crafts by Materials Toilet Paper Roll Kitchen Paper Roll Castle Posted by By Merryn August 23, 2011We saw some old cardboard boxes and kitchen paper rolls today and decided to make…
Posted inCraft from Recycled Materials Deepavali Festive Crafts Hari Raya Toilet Paper Roll Toilet Paper Roll Oil Lamp Posted by By Merryn July 28, 2011We are in the festive spirit and will be making oil lamp today :) Toilet…
Posted inArt Crafts Craft from Recycled Materials Toilet Paper Roll Abstract Art – Toilet Paper Roll Posted by By Merryn July 23, 2011We are going to make an abstract art using toilet paper roll today :) Abstract…
Posted inCotton Craft from Recycled Materials Crafts by Materials Paper Plate Crafts Toilet Paper Roll Paper Plate TP Roll Mushroom Posted by By Merryn July 10, 2011We are still in the mushroom craze so that is what we'll be making today…
Posted inAnimal Crafts Cat Craft from Recycled Materials Egg Carton Toilet Paper Roll Toilet Roll Cat Pencil Holder Posted by By Merryn June 28, 2011Meow! My boy loves cat and he'll get excited each time we do a cat…
Posted inAnimal Crafts Craft from Recycled Materials Egg Carton Fridge Magnets Turtle Egg carton turtle Posted by By Merryn June 20, 2011We will be going to the beach real soon for a holiday. Getting really excited!…
Posted inBottles Craft from Recycled Materials Paper Crafts Papier Mache Vehicle Paper Mache Aeroplane Posted by By Merryn June 15, 2011We are very excited today. We did a paper mache aeroplane! We can now build…