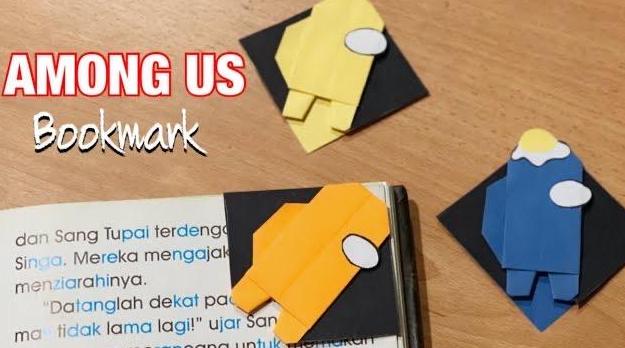
AMONG US Origami Bookmark

0

Posted by Merryn | Posted in Bookmark, Origami, Paper Crafts | Posted on 09-03-2021 | 2,456 views

Tags: , ,

The children are back at school and with that, they’ll need bookmarks for their studies. We made these AMONG US origami bookmarks yesterday. My youngest boy brought them to school and immediately his classmates requested for them too. My boy happily told them, “Okay, my Mummy will help to make them for all of you”

Oh boy… 

Angpow Origami Monkey

0

Posted by Merryn | Posted in Animal Crafts, Chinese New Year, Festive Crafts, Monkey, Origami, Paper Crafts | Posted on 08-01-2016 | 8,150 views

Tags: , ,

Chinese New Year is just a month away and we will be welcoming the Fire Monkey this year.

Let’s make this cute origami monkey to welcome the year of the Monkey.

Cute Angpow Origami Monkey.

For more details, please click here.

Origami Whale

0

Posted by Merryn | Posted in Animal Crafts, Origami, Paper Crafts, Whale | Posted on 01-06-2014 | 25,676 views

Tags:

It’s the school holidays now so let’s make an origami whale.
Origami Whale_1 Crafty Crafted

Origami Whale_2 Crafty Crafted

Origami Whale_3 Crafty Crafted

Origami Whale_4

Origami Whale_5 Crafty Crafted

Origami Whale Crafty Crafted

OK so it’s the school holidays and I just wanted to do something different with my entry. Hehe. This is not my usual entry. There is no step-by-step instructions but just comic of my two kids because I’ve posted a step-by-step instructions on how to fold an origami whale back in 2009. If you need the full instructions, click here.

Origami cranes for Japan

3

Posted by Merryn | Posted in Animal Crafts, Bird, Origami, Paper Crafts | Posted on 21-04-2011 | 10,189 views

Tags:

We were in Sunway Giza this evening and saw this..

Let’s fold origami cranes for Japan!

They say anyone who folds a thousand origami cranes will have their heart’s desire come true.

Let’s together fold MORE than one thousand origami cranes for the Land of the Rising Sun in light of their recent quake and tsunami plight.

Origami papers and simple instructions were provided.

Ethan trying to figure out what to do..

He is getting it… it is starting to turn out to be a crane 😀

There! His origami crane. I think the tail is a little bit off but it’s okay. It’s the effort and thoughts that counts right? He is barely 4 years old, give him a break! 😛

Ready to insert the origami crane into the box provided.

We did not one but four origami cranes. We would love to stay on and do more but we ran out of time.

Will definitely go back to Sunway Giza soon to make more origami cranes.

Our Heart Goes to the people of Japan…

Origami Snake

2

Posted by Merryn | Posted in Animal Crafts, Origami, Paper Crafts, Snake | Posted on 14-01-2011 | 13,053 views

Tags: , ,

Let’s make a snake today 😀


Origami Snake


Fold a square paper half


Fold half again and open.


Fold two ends to meet in the middle.


Fold again.


Open up the previous folds. With the lines as a guide, fold as shown in the picture.


Fold down.


Fold up again.


Do the same for the top.


Fold them together and you'll get your origami snake 🙂


Origami Ice-cream

0

Posted by Merryn | Posted in Origami, Paper Crafts | Posted on 09-08-2010 | 13,878 views

Tags: , ,

It’s time to indulge in delicious ice-cream 🙂

Origami Ice-cream

Fold a square paper half

Fold both ends to meet in the middle

Fold it back down as shown in the picture

Turn it around and fold back the excess ends.

Fold the top ends to meet in the middle.

Fold down as shown in the picture above.

Fold up again.

Like this.

Fold down again.

And up again 🙂

Turn it around and you’ll have this.

Draw lines for the cone and your ice-cream is done 🙂

Slurp! Slurp! Yummy 😀

Origami Fox

2

Posted by Merryn | Posted in Animal Crafts, Fox, Origami, Paper Crafts | Posted on 07-05-2010 | 13,509 views

Tags: , ,

It has been quite some time we did not touch on origami. If not for all the emails I’ve been getting requesting for origami, it might have just slipped out of my mind. I’ve just been too engrossed with paper art, foams and painting lately 😛 Sorry peeps 😀

Ok, let’s get started. Let’s make an origami fox today 🙂

Origami fox

Fold a square paper half.

Fold again as shown in the picture.

Fold up both ends as shown in the picture.

Turn it over. Draw eyes and nose.

Origami fox

Origami Goldfish

3

Posted by Merryn | Posted in Animal Crafts, Fish, Origami, Paper Crafts | Posted on 19-01-2010 | 19,412 views

Tags: , , ,

I love anything marine 🙂 Let’s do an origami goldfish today.

Origami Goldfish

You'll need a square paper.

Fold half with the white side facing out.

Fold a flip down.

Fold the other side too.

Fold down a flap for the tail.

Make a small fold for the mouth.

Draw the eyes and your goldfish is done 🙂

If you have any origami you want to share with us, submit it here and we’ll link it back to you 🙂

Origami Alphabet – R

9

Posted by Merryn | Posted in Alphabet, Origami, Paper Crafts | Posted on 07-01-2010 | 13,530 views

Tags: ,

The letter of the day is ‘R’ 😀 Let’s do this simple Origami R.

Origami

Origami R

Fold a square paper half. Then fold the bottom end to meet the middle line.

Fold all the remaining corners to the middle. Fold the right end to meet the middle line.

Fold as shown above and turn it around.

Fold back and your letter R is ready 😀

Share your origami with us. Submit it here and we’ll link it back to you 😀

Origami Alphabet – O

2

Posted by Merryn | Posted in Alphabet, Origami, Paper Crafts | Posted on 24-12-2009 | 9,028 views

Tags: , ,

Origami Alphabet

Origami

Let's start with the letter O today.

Let's start with the letter O today.

Fold a square paper half.

Fold a square paper half.

Fold the bottom half to meet the middle line.

Fold the bottom half to meet the middle line.

Do the same with the remaining three corners.

Do the same with the remaining three corners.

Make a small fold for all four corners.

Make a small fold for all four corners.

Turn it around and your origami O is done :)

Turn it around and your origami O is done 🙂

Origami Yacht

4

Posted by Merryn | Posted in Origami, Paper Crafts, Vehicle | Posted on 16-12-2009 | 9,900 views

Tags: , ,

Let’s go sailing today 🙂

Origami Yacht

Origami Yacht

Fold the paper half.

Fold the paper half.

Fold up.

Fold up.

Fold up again as shown in the picture. Your yacht is now ready. So simple.

Fold up again as shown in the picture. Your yacht is now ready. So simple.

If you have worked on an origami recently and would like to share with us, submit your origami here. We will link it back to you 🙂

Origami Bear

2

Posted by Merryn | Posted in Animal Crafts, Bear, Origami, Paper Crafts | Posted on 10-12-2009 | 13,844 views

Tags: , , ,

Let’s do an origami bear today.

Origami Bear

Origami Bear

My students figuring out what to do next..

My students figuring out what to do next..

Fold a square paper half.

Fold a square paper half.

Fold as shown above.

Fold as shown above.

Fold both sides out.

Fold both sides out.

Fold a flip on both ends again.

Fold a flip on both ends again.

Fold a small flip down on both top sides.

Fold a small flip down on both top sides.

Turn it around and fold up a flip.

Turn it around and fold up a flip.

Fold back a small flip as the upper lip.

Fold back a small flip as the upper lip.

Fold back the lower lip and draw eyes. Your bear is done.

Fold back the lower lip and draw eyes. Your bear is done.

The kids with their bears :D

The kids with their bears 😀

Craft Demonstration – ParenThots Family Day

7

Posted by Merryn | Posted in Announcement, Art Crafts, Bookmark, Christmas Ideas, Christmas tree ornaments, Craft Foam, Crafts by Materials, Fridge Magnets, Ladybug, Origami | Posted on 29-11-2009 | 10,269 views

Tags: , ,

Our craft demonstration during the ParenThots Family Day is finally over. Here are some pictures of the event. Enjoy 🙂

The booth before the 'crafty' touch :)

The booth before the 'crafty' touch 🙂

Crafters at work.

Crafters at work.

Ethan's artwork for display.

Ethan's artwork for display.

Our booth with the bunting, banner and artwork :)

Our booth with the bunting, banner and artwork 🙂

Foam Christmas Tree and Ladybugs are the chosen crafts to be given away to visitors.

Foam Christmas Tree and Ladybugs are the chosen crafts to be given away to visitors.

The art and craft work on display.

The art and craft work on display.

Kids trying their hands on origami as I guide them along..

Kids trying their hands on origami as I guide them along..

The scorpion boy! :P

The scorpion boy! 😛

The origamis kids can come out with.. Simply amazing!

The origamis kids can come out with.. Simply amazing!

Kids having fun...

Kids having fun...

Visitors filling up the blog subscription form.

Visitors filling up the blog subscription form.

Finally, the people who made it possible that day. A million thankx go out to Kimmy and family, my parents and also my Darling husband for helping me out. I can't possibly make it without you guys. :D

Finally, the people who made it possible that day. A million thankx go out to Kimmy and family, my parents and also my Darling husband for helping me out. I can't possibly make it without you guys. 😀

Origami Owl

7

Posted by Merryn | Posted in Animal Crafts, Origami, Owl, Paper Crafts | Posted on 23-11-2009 | 23,479 views

Tags: , , ,

Boot boot… Any night owl around? Let’s do this extremely simple origami owl.

Origami Owl.

Origami Owl.

Fold a square paper half.

Fold a square paper half.

Fold a small flip down at the top.

Fold a small flip down at the top.

Fold the bottom to meet the top flip.

Fold the bottom to meet the top flip.

Your folds should be as shown above.

Your folds should be as shown above.

Fold both sides so that they meet in the middle.

Fold both sides so that they meet in the middle.

Your origami owl is almost done. Draw the eyes and wings and you are done!

Your origami owl is almost done. Draw the eyes and wings and you are done!

Oh yeah, another thing. Fold a small flip down as the beak. You won't want your owl to be beak-less! :P

Oh yeah, another thing. Fold a small flip down as the beak. You won't want your owl to be beak-less! 😛

The very simple origami owl, even a two-year old can do it! :)

The very simple origami owl, even a two year old can do it! 🙂

Origami Candy Cane

4

Posted by Merryn | Posted in Bookmark, Christmas Ideas, Christmas tree ornaments, Origami, Paper Crafts, Party Craft | Posted on 18-11-2009 | 11,343 views

Tags: , , ,

This Christmas, let’s make an origami candy cane.

Origami candy cane.

Origami candy cane.

Fold as shown above and turn over.

Fold as shown above and turn over.

Roll up.

Roll up.

Roll all the way until you get this.

Roll all the way until you get this.

Fold forward.

Fold forward.

Fold backward and you are done.

Fold backward and you are done.

You may use this candy cane as a bookmark, Christmas tree ornament or anything to your fancy.

Have other Christmas ideas to share? Submit your crafts here and we’ll share it with the world this Christmas. 🙂

Origami worm

2

Posted by Merryn | Posted in Origami, Paper Crafts | Posted on 16-11-2009 | 12,213 views

Tags: ,

Today, shall we do a worm?

Origami worm

Origami worm

Fold a square piece of paper half.

Fold a square piece of paper half.

Next, fold as shown above.

Next, fold as shown above.

Fold again as shown above.

Fold again as shown above.

You should have several folds like this.

You should have several folds like this.

Fold in half.

Fold in half.

Pocket fold the front portion for the head.

Pocket fold the front portion for the head.

Have other interesting origami to share? Submit your work here and we’ll link it back to you. 🙂

Snowflake Crystal

4

Posted by Merryn | Posted in Art Crafts, Christmas Ideas, Christmas tree ornaments, Origami, Paper Crafts, Party Craft | Posted on 29-10-2009 | 11,846 views

Tags: , ,

This Christmas, let’s do some snowflakes to decorate our house.

Snowflake crystal.

Snowflake crystal.

Fold in half to make a crease.

Fold in half to make a crease.

Fold half again.

Fold half again.

Fold as shown above.

Fold as shown above.

Turn over.

Turn over.

Fold as above.

Fold as above.

Fold in half.

Fold in half.

Draw the lines and cut accordingly.

Draw the lines and cut accordingly.

You may want to paste it onto a hard board and paste some glitters on it as a Christmas tree ornament or just paste the snowflake onto your window panes.

You may want to paste it onto a hard board and paste some glitters on it as a Christmas tree ornament or just paste the snowflake onto your window panes.

Got some awesome Christmas ideas? Come share it with us.  Submit your crafts here. 🙂

Origami Heart Bookmark

6

Posted by Merryn | Posted in Bookmark, Festive Crafts, Origami, Paper Crafts, Shapes, Valentine's Day | Posted on 13-10-2009 | 26,153 views

Tags: , , ,

Back in my school days, I loved making bookmarks for my friends. As students, that was what we often used. Want to try making an origami heart bookmark for your loved ones? Let’s go..

Origami Heart Bookmark.

Origami Heart Bookmark.

Fold in half to make a crease.

Fold in half to make a crease.

Cut along the crease with scissors.

Cut along the crease with scissors.

Fold in half to make a crease and fold back. Fold both sides to make creases again and fold back. You should get four columns.

Fold in half to make a crease and fold back. Fold both sides to make creases again and fold back. You should get four columns.

Fold to make a crease and fold back.

Fold to make a crease and fold back.

Using the recent crease as your guide, turn the paper and fold and turn back.

Using the recent crease as your guide, turn the paper and fold and turn back.

Fold to meet the center line.

Fold to meet the center line.

Fold the other so both meet the center line.

Fold the other so both meet the center line.

Fold backward.

Fold backward in the dotted line.

Push the upper part up and flatten it.

Push the upper part up and flatten it.

Do the same for the other side.

Do the same for the other side.

Fold and turn over.

Fold and turn over.

Your origami heart bookmark is done. :)

Your origami heart bookmark is done. 🙂

Have any other bookmark ideas? Share with us here and we’ll link it back to you. 🙂

Origami Skull

4

Posted by Merryn | Posted in Festive Crafts, Halloween, Origami, Paper Crafts | Posted on 08-10-2009 | 44,441 views

Tags: , ,

This is an interesting origami – a skull! Let’s do this for Halloween.

Origami skull.

Origami skull.

Fold a square paper half.

Fold a square paper half.

Fold to meet the center.

Fold to meet the center.

Fold in the top.

Fold in the top.

Fold as shown.

Fold as shown.

Fold down.

Fold down.

Turn over and fold as shown above.

Turn over and fold as shown above.

Fold down.

Fold down.

Fold up again.

Fold up again.

Fold again. Draw the eyes and nostrils.

Fold again. Draw the eyes and nostrils.

My boy with the origami skull.

My boy with the origami skull.

My students with their 'creation'

My students with their 'creation'

Have better Halloween ideas? Come and share with us here. 🙂

Origami Mini Bin

5

Posted by Merryn | Posted in Origami, Paper Crafts | Posted on 30-09-2009 | 12,344 views

Tags: ,

A Crafty-Crafted Friend's submission of a handy origami mini bin.

A Crafty-Crafted Friend's submission of a handy origami mini bin.

Craft submitted by mnhl of http://mnhldiary.blogspot.com/

mnhl said,

You will need a piece of paper (magazine size is the best). I used recycle magazines.

You will need a piece of paper (magazine size is the best). I used recycle magazines.

Fold the paper into half. Fold to another half and you will get a smaller square size. Lift up the corner and press to get a triangle.

Fold the paper into half. Fold to another half and you will get a smaller square size. Lift up the corner and press to get a triangle.

Do the same for the other side.

Do the same for the other side.

Now, you will get a triangle shape without the slit at the bottom.

Now, you will get a triangle shape without the slit at the bottom.

Fold the corner to meet the middle line. Do the same to the 3 other corners.

Fold the corner to meet the middle line. Do the same to the 3 other corners.

Fold the bottom upwards. Do the same for the other side too.Open slowly and you will get a mini bin.

Fold the bottom upwards. Do the same for the other side too.Open slowly and you will get a mini bin.

Come and share your craft with us. You too can submit your craft here. 🙂