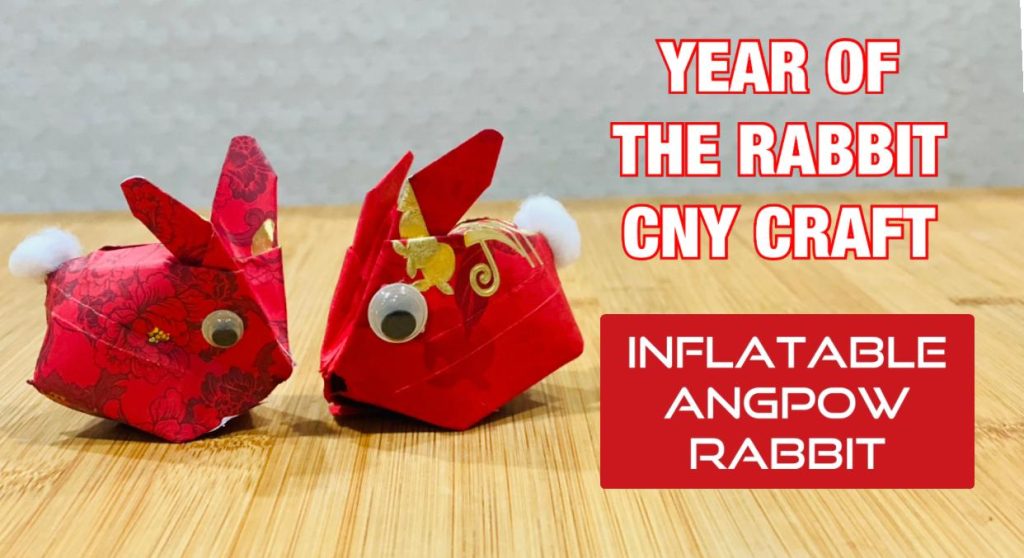
Posted inChinese New Year Rabbit 10 Super Simple DIY Angpao Rabbit Craft for Chinese New Year Posted by By Merryn September 23, 2022We will be welcoming the Year of the Rabbit on January 22, 2023. The rabbit is the…
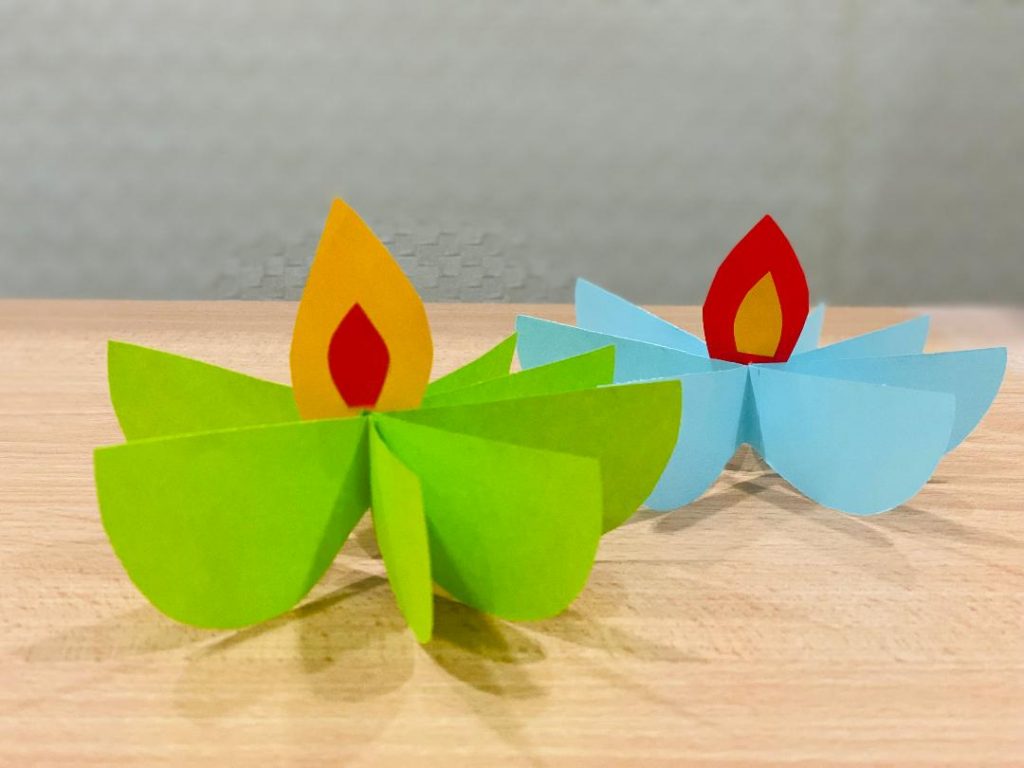
Posted inDeepavali Festive Crafts Paper Crafts DIY Diwali Paper Diya Posted by By Merryn September 12, 2022Deepavali is a Sanskrit vocabulary meaning a 'line of lamps'. It is one of the…
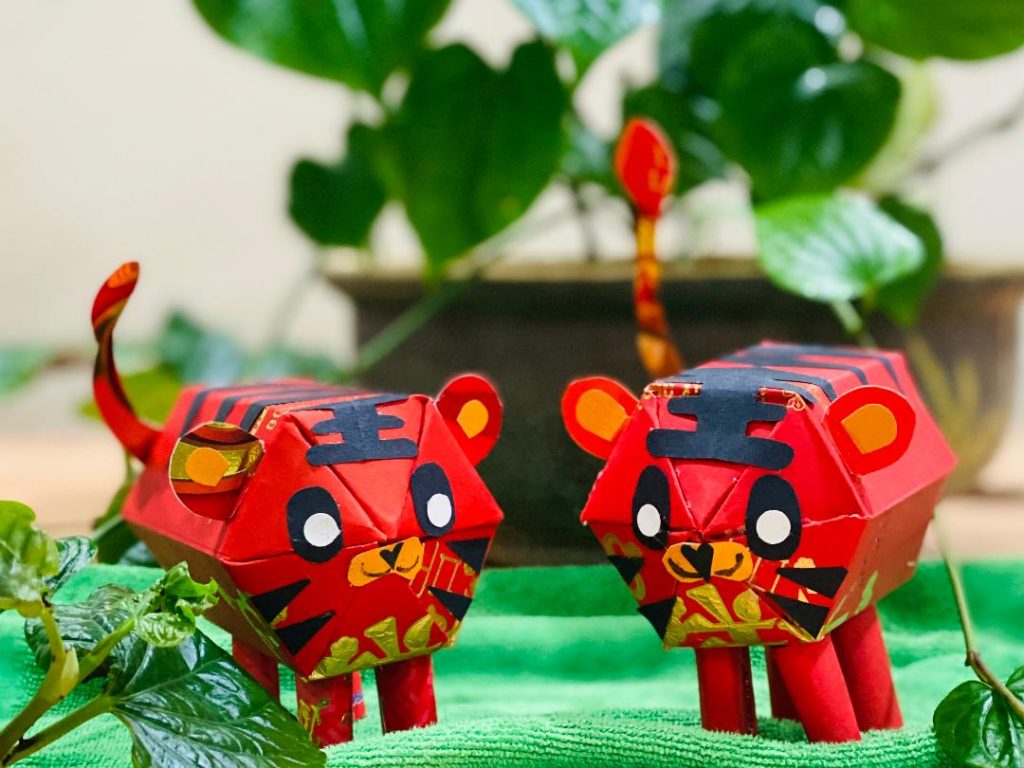
Posted inAnimal Crafts Chinese New Year Tiger DIY Chinese New Year Red Packet Decor | Year of the TIGER Easy Angpow Decor Posted by By Merryn December 8, 2021Here's another TIGER angpow creation for the upcoming Chinese New Year. This is a simple…
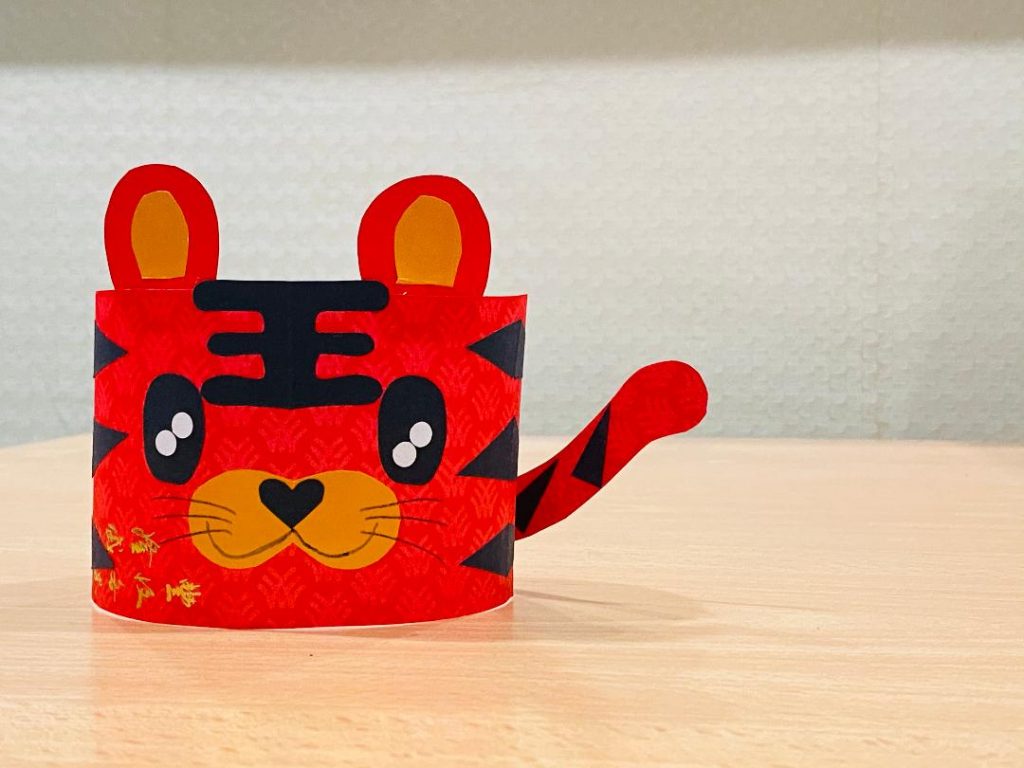
Posted inAnimal Crafts Chinese New Year Tiger DIY Chinese New Year Red Packet Decor | Year of the TIGER Angpow Decor | My Original Creation Posted by By Merryn November 27, 2021Here's another Chinese New Year Tiger red packet decor tutorial. These cute little tiger ornament…
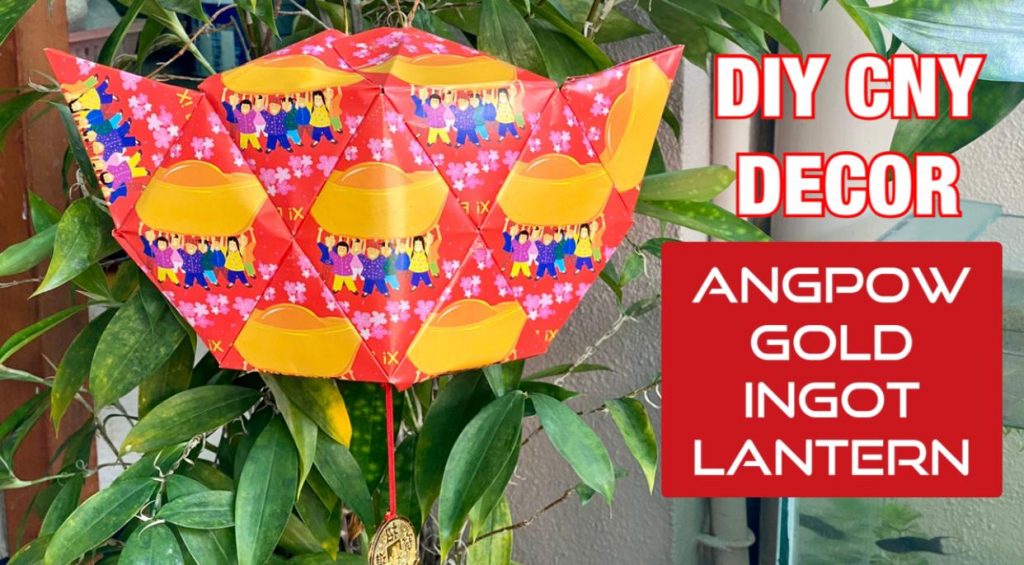
Posted inChinese New Year DIY Chinese New Year Red Packet Decor | Easy Angpow GOLD INGOT LANTERN Posted by By Merryn November 11, 2021Gold ingot (‘Yuan Bao’ in Chinese) is an ancient Chinese gold medium for exchanging expensive…
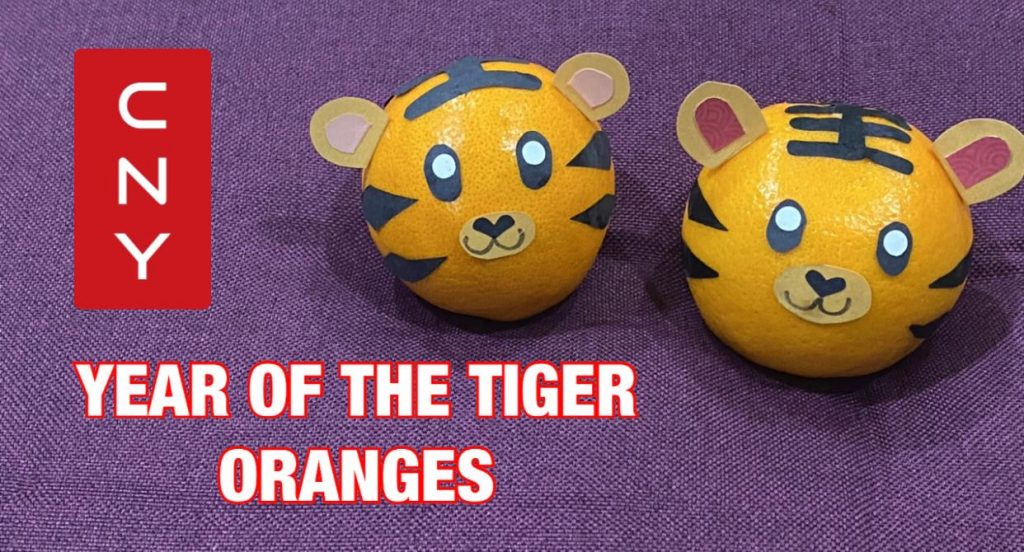
Posted inAnimal Crafts Chinese New Year Chinese New Year DIY | Year of the TIGER Orange decoration Posted by By Merryn October 29, 2021Oranges and other citrus fruit - kumquats, tangerines and pomelo are common Chinese New Year…
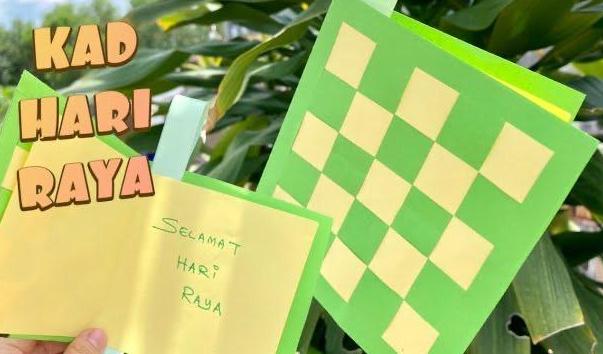
Posted inFestive Crafts Hari Raya Ketupat Inspired Hari Raya Paper Craft Posted by By Merryn March 14, 2021Today we will be learning to make this KETUPAT inspired DIY Hari Raya greeting card.…
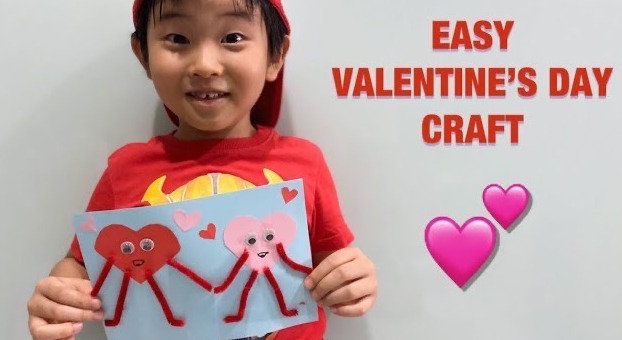
Posted inPaper Crafts Valentine's Day Easy Valentine’s Day Heart Craft Idea Posted by By Merryn February 12, 2021Valentine's Day is just a couple of days away. Let's get our kids to celebrate…
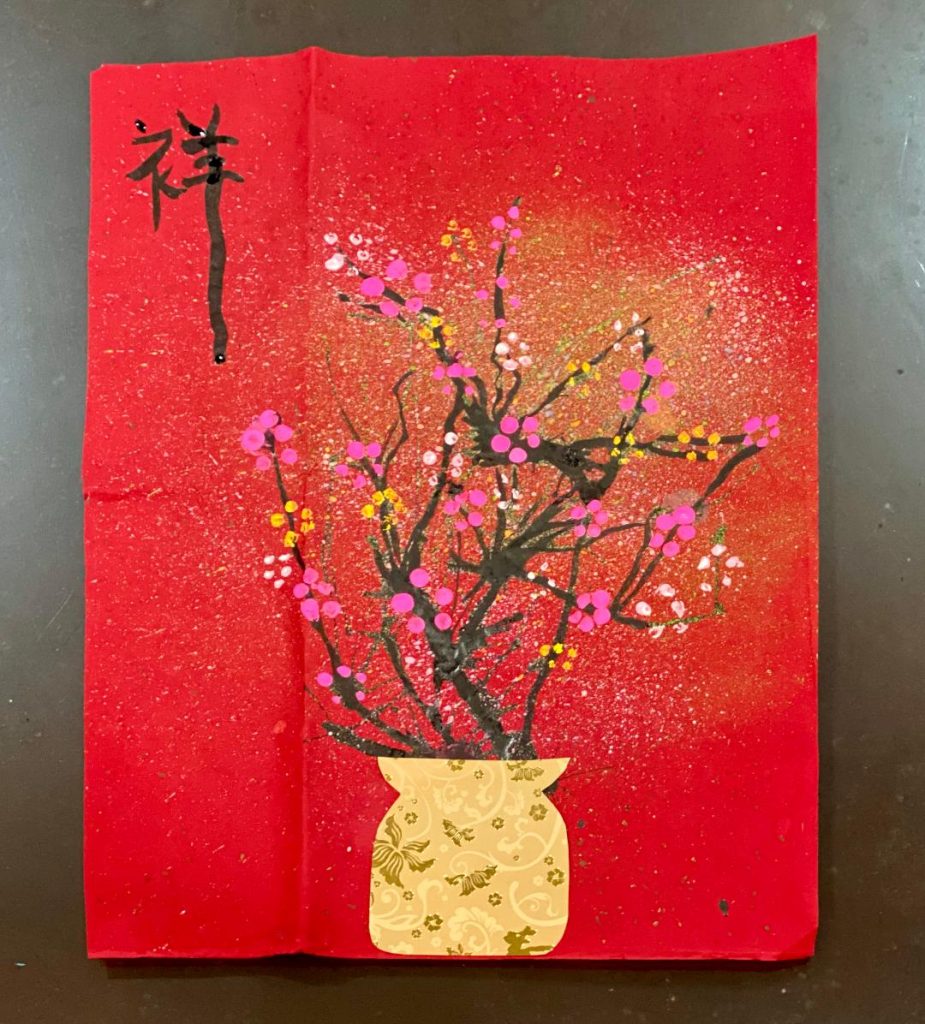
Posted inChinese New Year Chinese New Year Plum Blossom Art Posted by By Merryn February 7, 2021Today, we are going to share this simple yet amazingly beautiful Chinese New Year Plum…
Posted inChinese New Year Festive Crafts Paper Crafts 30 DIY Chinese New Year Angpow Decor Ideas Posted by By Merryn January 19, 2021We will be celebrating Chinese New Year of the OX in 2021. It may be…
Posted inChristmas Ideas Festive Crafts Snowman YouTube tutorial Snowman / Snowball Christmas Cookies Posted by By Merryn December 9, 2020Christmas is fast approaching. Due to the pandemic that is affecting everyone globally, some of…
Posted inFestive Crafts Halloween YouTube tutorial Ghost Lollipops Posted by By Merryn October 30, 2017It's Halloween! Happy Halloween to all. We made Ghosts out of lollipops today. Lollipop ghosts…
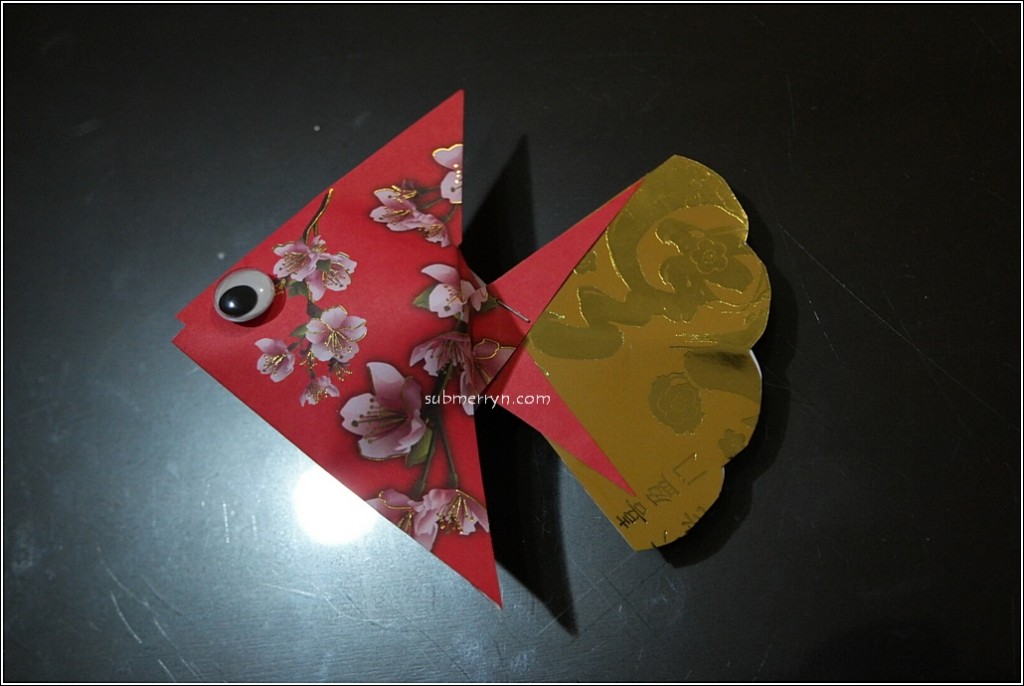
Posted inAnimal Crafts Chinese New Year Festive Crafts Fish Chinese New Year Ang Pow Fish Posted by By Merryn February 3, 2016Remember our Ang Pow Fish decor we made back in 2010? Well, we improved it…
Posted inAnimal Crafts Chinese New Year Festive Crafts Monkey Origami Paper Crafts Angpow Origami Monkey Posted by By Merryn January 8, 2016Chinese New Year is just a month away and we will be welcoming the Fire…
Posted inFestive Crafts Hari Raya Hari Raya Greeting Card Posted by By Merryn July 1, 2015I just realized we have not been updating this blog since late last year. That…
Posted inChinese New Year Festive Crafts Toilet Paper Roll Red Packet Lantern Posted by By Merryn December 29, 2014Chinese New Year is just one and a half month away so let's start making…
Posted inBottles Paper Mache Papier Mache Teacher's Day Vehicle Bottle Pencil Case Posted by By Merryn May 30, 2013This is a great school holiday crafts for kids. Today we will be transforming a…
Posted inFestive Crafts Yarn bowl Posted by By Merryn November 7, 2012The year end is coming and that only means lots and lots of celebrating and…
Posted inHalloween Paper Crafts Halloween Paper Pumpkin Posted by By Merryn October 30, 2012Halloween is fast approaching and we hope it's not to late to share this creation,…
Posted inFestive Crafts Halloween Halloween Eye Patch Posted by By Merryn October 17, 2012We are making Halloween eye patch today. Halloween eye patch We'll need a long rubber…
Posted inAnimal Crafts Cat Festive Crafts Halloween Paper Crafts DIY Halloween Trick or Treat Bag Posted by By Merryn October 16, 2012Halloween is just around the corner. Let's start preparing for 'Trick or Treat'. We don't…
Posted inHalloween Halloween Treats: Edible SPIDER Posted by By Merryn October 9, 2012Oh yummy, yummy. It's been a while since we last ate SPIDERS! Spiders are simply…
Posted inAnimal Crafts Chinese New Year Fish Koi fish painting for kids Posted by By Merryn July 8, 2012The kids painted koi fish today in the Studio. It's super easy even a toddler…
Posted inCraft Foam Crafts by Materials Father's Day Ladybug Mother's Day Teacher's Day Craft foam picture frame Posted by By Merryn June 18, 2012It's Father's Day today. The kids did a foam picture frame to present to their…
Posted inAnimal Crafts Crafts by Materials Crafty Crafted Friends Easter Felt Festive Crafts Rabbit Felt Bunny Posted by By Merryn May 14, 2012Michael Ann of Michael Ann Made shared with us this cute little bunny felt craft. This…
Posted inAnimal Crafts Bee Craft from Recycled Materials Crafts by Materials Crepe Paper Mother's Day Toilet Paper Roll Crepe Paper Pencil Holder Posted by By Merryn April 29, 2012I've always loved the fine art of pottery. I wish to try pottery with the…
Posted inAnimal Crafts Cotton Crafts by Materials Easter Festive Crafts Lamb Easter Lamb craft Posted by By Merryn April 6, 2012It's Good Friday today. Are you done decorating your eggs for Easter? Inspired by DisneyFamilyFun,…
Posted inCraft from Recycled Materials Easter Festive Crafts Toilet Paper Roll Easter Egg Mickey Mouse Posted by By Merryn April 3, 2012Easter is just around the corner. Thanks to www.family.go.com, we found this cute way to…
Posted inCraft from Recycled Materials Print Art Toilet Paper Roll Valentine's Day Valentine’s Torch Posted by By Merryn February 13, 2012It's Valentine's Day in a few minutes time. We did a Valentine craft today. It…
Posted inCrafts by Materials Crepe Paper Festive Crafts Paper Crafts Shapes Valentine's Day Valentine's Day Crafts Puffy Heart Valentine Posted by By Merryn February 7, 2012Valentine's Day is around the corner. Let's make a puffy heart today <3 Valentine's Puffy…
Posted inChinese New Year Festive Crafts Paper Crafts Print Art DIY Ang Pow Packet Posted by By Merryn January 30, 2012I was a pre-school teacher when I was expecting my little artist Ethan. It was…
Posted inAnimal Crafts Chinese New Year Festive Crafts Fridge Magnets Fridge Magnet : Dragon Posted by By Merryn January 16, 2012Let's make a Dragon art today :) Dragon fridge magnet. Super simple and a fun…
Posted inAnimal Crafts Bird Craft from Recycled Materials Easter Toilet Paper Roll Toilet Paper Roll Bird Posted by By Merryn November 1, 2011Let's make a bird today. Not an angry bird but a cute one :D Toilet…
Posted inAnimal Crafts Bat Craft from Recycled Materials Festive Crafts Halloween Party Craft Toilet Paper Roll Toilet Paper Roll Halloween Bat Posted by By Merryn October 18, 2011Halloween is around the corner and it's time to make some creepy crafts :D Toilet…
Posted inHalloween Paper Plate Crafts Hungry Ghost Posted by By Merryn August 11, 2011The Ghost Festival, also known as the Hungry Ghost Festival is a traditional Chinese festival…